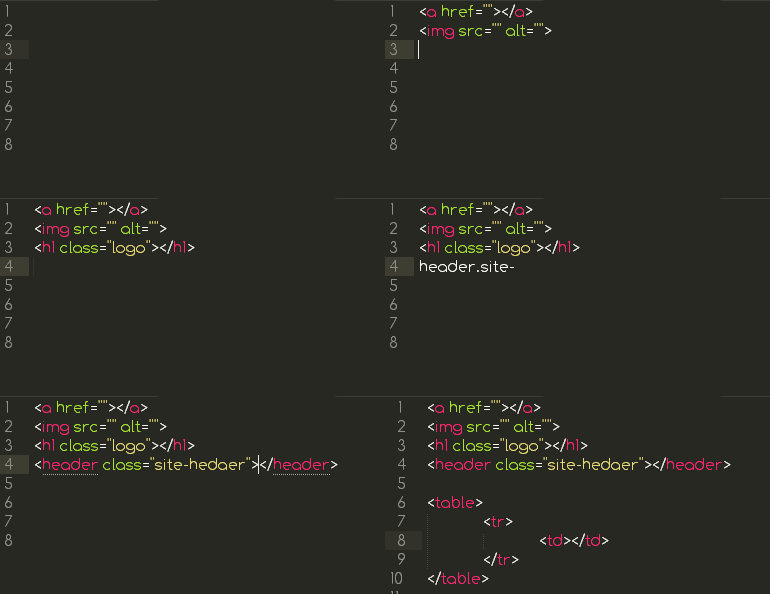
Emmet uses CSS-like selector syntax, You write CSS-like abbreviations, place your cursor at the end of abbreviation and then press Tab, Ctrl+E or any other keyboard key configured to expand abbreviations into actual HTML code. Emmet expands a into <a href=""></a>. You can also specify values, but if you don’t specify values, <a> will produce <a href=""></a> with tab stops inside each empty attribute. You can insert a target URL and hit Tab to go to the next edit point, where you can insert the next desired value.

Let’s see another example. If you write
div#header>h1.logo>a{site Name}You will have following code:
<div id="header">
<h1 class="logo"><a href="">site Name</a></h1>
</div>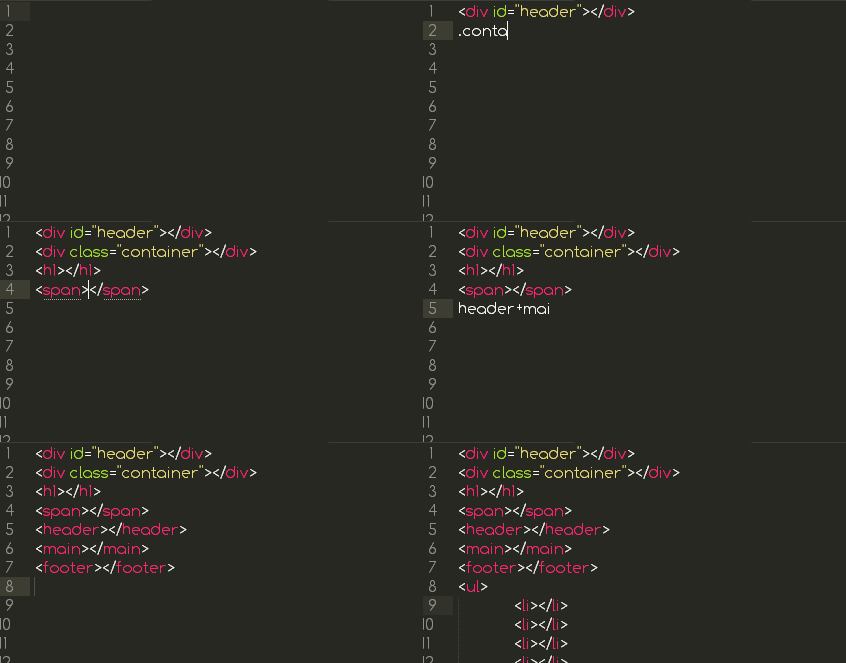
Here is a list of some supported operators.
Div, p, span)div will be expanded to <div></div>.
div#header, E#id)# is used to apply id’s to any element.
(div.container, aside.sidebar). is used to apply classes to any element.
div.header>div.main>.post> is used to create child elements.
(h1+h2)+ sign is used to create sibling elements.
li*5* symbol will create defined multiple numbers of any element. Useful to create list items.
li.item$*5$ symbol create item number. You can use it with * to create multiple items with numbering.
^ operator, you can climb one level up the tree and change context where following elements should appear:{} Parentheses can be used for grouping sub-trees in complex abbreviations.{} is used to add text to an element.Emmet also offers some more great features that I will discuss in detail later.
While Emmet abbreviations are good for generating HTML, XML or any other structured markup, they are also very useful for CSS. Emmet provides you with shorthand for CSS properties. For CSS syntax, Emmet has many predefined snippets for properties. you can expand the bd abbreviation to get a border: ; snippet, and br for border-right: ;. You can also specify a value for this property. Just type bl:10 for border-left: 10px;.
If you want to specify multiple values, use a hyphen to separate them: m10-20 expands to margin: 10px 20px;. To specify negative values, precede the first value with a hyphen and all the rest with double hyphens: m-10--20 expands to margin: -10px -20px;

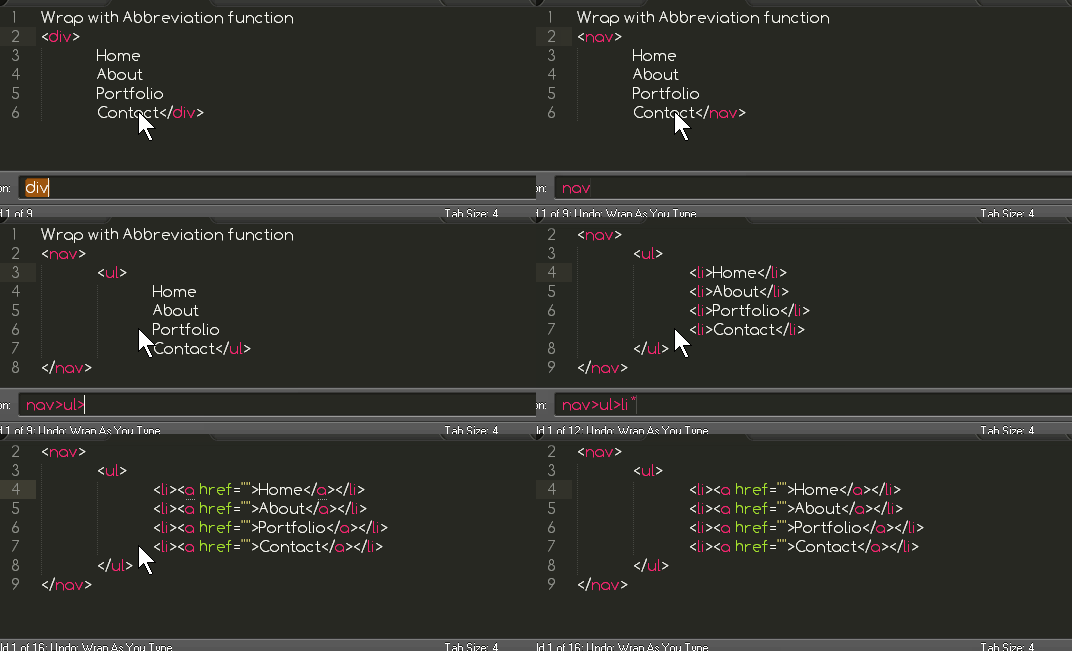
Emmet offers many useful and timesaving actions and keyboard shortcuts. Emmet offers unique tools that can greatly improve your editing experience, and is very helpful when you have to edit your HTML and CSS code to fix bugs and add new features. Some of Emmet’s actions are useful for editing existing HTML code, such as the Wrap with Abbreviation function. With this function you can wrap your navigation items in a navigation menu.
Some other available actions include:
If you have never used Emmet, you know that writing HTML code takes time. Let’s suppose you create a new HTML file and you need some necessary tags html, head, title, body with HTML5 doctype, like the following:
<!doctype HTML>
<HTML Lang="en">
<head>
<meta charset="UTF-8">
<title>Document</title>
</head>
<body>

</body>
</HTML>
You may have a default template to get started, or perhaps you save code and you just copy and paste code every time. If you are doing this, you are wasting your precious time. With Emmet it will take about two or three seconds to create the above code. Create a new file and save it as .html (e.g. index.html) and type html:5 or ! and press tab, or ctrl+e or any other trigger key in your text editor to expand the abbreviation and you will have HTML5 doctype and a few necessary tags.
In SublimeText Tab is the key used to expand abbreviations. Let’s start with some basics and later we will learn about more advanced examples. Create a new file with SublimeText, save it as emmet.html or index.html. Now type HTML:5 or ! and press Tab and you will have basic HTML code for our page.
There are so many shortcuts for HTML and CSS, here are some of the most widely used.
1 : Basic markup with HTML5 Doctype
!orhtml:5
expands to
<!doctype html>
<html lang="en">
<head>
<meta charset="UTF-8">
<title>Document</title>
</head>
<body>

</body>
</html>
2 : Script with Source
script:srcexpands to
<script src=""></script>3 : X-UA-Compatible Meta Tag
meta:compatexpands to
<meta http-equiv="X-UA-Compatible" content="IE=7">4 : Meta viwe port tag
meta:vpexpands to
<meta name="viewport" content="width=device-width, user-scalable=no, initial-scale=1.0, maximum-scale=1.0, minimum-scale=1.0">5 : CSS Style
styleexpands to
<style></style>6 : Linking favicon
link:faviconexpands to
<link rel="shortcut icon" type="image/x-icon" href="favicon.ico">7 : Link for RSS
link:rssexpands to
<link rel="alternate" type="application/rss+xml" title="RSS" href="rss.xml">8 : Link for atom
link:atomexpands to
<link rel="alternate" type="application/atom+xml" title="Atom" href="atom.xml">9 : anchor tag
aexpands to
<a href=""></a>10 : Link with default value
a:linkexpands to
<a href="http://"></a>11 : mail to link
a:mailexpands to
<a href="mailto:"></a>12 : Image
imgexpands to
<img src="" alt="">13 : Form with method get
form:getexpands to
<form action="" method="get"></form>14 : Form with method post
form:postexpands to
<form action="" method="post"></form>15 : Defaullt input
inputexpands to
<input type="text">16 : Input Hidden
input:hiddenexpands to
<input type="hidden" name="">17 : Button
btnexpands to
<button></button>18 : Button Submit
btn:sexpands to
<button type="submit"></button>19 : Necessary Table mark up
table+expands to
<table>
<tr>
<td></td>
</tr>
</table>
20 : Slelect Element
select+expands to
<select name="" id="">
<option value=""></option>
</select>
21 : Conditional styles for IE6
cc:ie6expands to
<!--[if lte IE 6]>

<![endif]-->
22 : Conditional styles for IE
cc:ieexpands to
<!--[if IE]>

<![endif]-->
23 : Conditional styles for Non IE Browsers
cc:noieexpands to
<!--[if !IE]><!-->

<!--<![endif]-->These are just a few tags, used by web developers frequently. You can view a complete list of supported syntax at http://docs.emmet.io/cheat-sheet/.
You can easily add default CSS or print style sheets. Just type link for basic link, link:CSS for default style.css file and link:print for print style-sheet. You can override the default attribute values and add new ones. Child elements can also be added as well.
1. Basic CSS link
Link
will transform into following code with tab stops inside empty href="" attribute.
<link rel="stylesheet" href="">
2. Linking default style.css link
Link:css
will transform into following code
<link rel="stylesheet" href="style.css">3. Linking print style sheet
Link:print
will transform to.
<link rel="stylesheet" href="print.css" media="print">4. Overriding default attribute
link[rel=prefetch title="Hello world"]
expands to
<link rel="prefetch" href="" title="Hello world">5. Adding child elements
link>xsl:apply-templates
expands to
<link rel="stylesheet" href="">
<xsl:apply-templates></xsl:apply-templates>
</link>Abbreviations in Emmet make writing tedious markup code a breeze. Abbreviations are optimized for, but not limited to, HTML and XML generation. The abbreviations’ syntax looks like CSS selectors, so it won’t be difficult for you to learn it, if you are familiar with CSS.
Let’s use abbreviations to create some basic HTML markup for our web page, with header, main and footer section with necessary classes.
Let’s start with a very basic example. just type
header#site-headerand you will see
<header id="site-header"></header>If you type
header#site-header>h1.logo>a{site name}and press Tab, it will expand to
<header id="site-header">
<h1 class="logo"><a href="">site name</a></h1>
</header>To create a web page with the basic necessary mark up, type the following code and press tab or Ctrl+E in your editor.
header#site-header^div.container#main>.primary+aside#sidebar^footer#site-footerThe above abbreviation will generate the following markup. As you can see, we have three sections for our page: first, we have a header with an id of site-header, then we have our main div with the class .container and id main, and then we have a footer section with an id of site-footer. You can apply both ids and classes to any elements, as I have applied to our <div class="container" id="main">
<header id="site-header"></header>

<div class="container" id="main">
<div class="primary"></div>
<aside id="sidebar"></aside>
</div>

<footer id="site-footer"></footer>
A more complex example: In the above example, I created sections (header, main, primary, aside, footer) for our web page, but now I’m going to add more information and markup in our sections. Emmet is very powerful, and you can generate very complex code. In the following example I am going to create markup for the whole web page. Have a look at it and then I will define it.
(header#site-header>h1.logo>a[href=#]{site name})^div.container#main>(.primary>h1.post-title{post title here}+img.featured-img+p{post text here})+(aside#sidebar>#widget>h2.widget-title+p{widget text})^footer.#site-footer>.col-4.widget*3>h2.widget-title+p.widget-textThe above code will generate following HTML markup:
<header id="site-header">
<h1 class="logo"><a href="#">site name</a></h1>
</header>

<div class="container" id="main">
<div class="primary">
<h1 class="post-title">post title here</h1>
<img src="" alt="" class="featured-img">
<p>post text here</p>
</div>
<aside id="sidebar">
<div id="widget">
<h2 class="widget-title"></h2>
<p>widget text</p>
</div>
</aside>
</div>

<footer class="" id="site-footer">
<div class="col-4 widget">
<h2 class="widget-title"></h2>
<p class="widget-text"></p>
</div>
<div class="col-4 widget">
<h2 class="widget-title"></h2>
<p class="widget-text"></p>
</div>
<div class="col-4 widget">
<h2 class="widget-title"></h2>
<p class="widget-text"></p>
</div>
</footer>
Now look at the above code carefully and note the functions and symbols I’ve used to generate the above code. I have used parentheses () to group the header section, then I have used ^ to climb up one section, to separate the header and the #main container. To make the above long abbreviation more simple, let’s break it into three parts.
This abbreviation will generate markup for the header section:
(header#site-header>h1.logo>a[href=#]{site name})^This abbreviation will generate markup for the main section:
div.container#main>(.primary>h1.post-title{post title here}+img.featured-img+p{post text here})+(aside#sidebar>#widget>h2.widget-title+p{widget text})^This abbreviation will generate markup for the footer section:
footer.#site-footer>.col-4.widget*3>h2.widget-title+p.widget-textEmmet uses syntax similar to CSS selectors for describing element positions inside generated tree and element attributes. You can use element names like div or p to generate HTML tags.
. is used to add classes to elements and # is used to add ids. Here are some example for ids and classes. You can apply multiple ids and classes to any element.
ul.nav.nav-main.nav-staticwill generate
<ul class="nav nav-main nav-static"></ul>header#site-headerwill generate
<header id="site-header"></header>
As you can see in the above examples, I have applied multiple classes to the ul.
> is used to to nest elements inside each other. You can use multiple times. It can be useful to create navigation menus and lists. See the code below i am going to create a nav menu with ul, list item and list item will be a link.
nav>ul>li>a
will generate the following nav menu. nav is a parent item, then we have ul as a child element and li with a tag as a grandchild.
<nav>
<ul>
<li>
<a href=""></a>
</li>
</ul>
</nav>
The + sign is used to create sibling items. It is useful to create elements near each other, on the same level. The following abbreviation will generate three siblings.
header+.main+footerwill output
<header></header>
<div class="main"></div>
<footer></footer>
With > you can create elements inside each other. But if you want to climb one level up in the created HTML tree, you will have to use the ^ symbol. Let’s see an example of the same abbreviation with different + and ^ operators.
Example 1: +
header+article>p>str+bq+footerwill generate the following code.
<header></header>
<article>
<p>
<strong></strong>
<blockquote></blockquote>
<footer></footer>
</p>
</article>
As you can see strong, blockquote and footer are nested inside the p paragraph tag, but we want to blockquote after p as a sibling element and footer as a different section. For this purpose we will have to use the ^ operator.
Example 2: ^
Type the following code and hit tab.
header+article>p>str^bq^footerand we have the markup that we need:
<header></header>
<article>
<p><strong></strong></p>
<blockquote></blockquote>
</article>
<footer></footer>Multiplication is one of the very useful features in Emmet. With the * operator you can define how many times element should be outputted. It can be very helpful to create navigation menus with multiple list items.
nav>ul>li*5>awill generate an unordered list with five list item. I have also used the a tag to make the list items clickable links. You can replace 5 with your desired number.
<nav>
<ul>
<li><a href=""></a></li>
<li><a href=""></a></li>
<li><a href=""></a></li>
<li><a href=""></a></li>
<li><a href=""></a></li>
</ul>
</nav>We can use the multiplication *operator to repeat elements, but with $ we can number them. Use the $ operator inside an element’s name, attribute’s name or attribute’s value to output the current number of the repeated element. It can be used to create lists with numbering. Let’s see some examples of how the $ operator works.
Example 1: Item numbering
ul>li.item$*5following mark up.
<ul>
<li class="item1"></li>
<li class="item2"></li>
<li class="item3"></li>
<li class="item4"></li>
<li class="item5"></li>
</ul>
To add 0 (zero) before numbers, use multiple $ signs. li.item$$ will generate <li class="item01"></li> and li.item$$$ will generate <li class="item001"></li>.
Example 2: adding zero before numbers
ul>li.item$$*5>a out outs the following code. You can see 0 before numbers.
<ul>
<li class="item01"><a href=""></a></li>
<li class="item02"><a href=""></a></li>
<li class="item03"><a href=""></a></li>
<li class="item04"><a href=""></a></li>
<li class="item05"><a href=""></a></li>
</ul>
Example 3: Changing direction
It is also possible to change the direction of numbering. Emmet uses the @- modifier to change the direction.
ul>li.item$$@-*5>awill out put following HTML markup, an unordered list with descending numbers.
<ul>
<li class="item05"><a href=""></a></li>
<li class="item04"><a href=""></a></li>
<li class="item03"><a href=""></a></li>
<li class="item02"><a href=""></a></li>
<li class="item01"><a href=""></a></li>
</ul>
Changing the numbering base: Starting number
To change the counter base value, add a @N modifier to $. With this modifier you can set your desired starting number.
ul>li.item$@3*5expands to the following markup.
<ul>
<li class="item3"></li>
<li class="item4"></li>
<li class="item5"></li>
<li class="item6"></li>
<li class="item7"></li>
</ul>
It is possible to use both base @N and direction @- modifier together. Here is an example.
ul>li.item$@-3*5>awill transform into the following markup.
<ul>
<li class="item7"><a href=""></a></li>
<li class="item6"><a href=""></a></li>
<li class="item5"><a href=""></a></li>
<li class="item4"><a href=""></a></li>
<li class="item3"><a href=""></a></li>
</ul>
Grouping elements is also very easy with Emmet. You can use () to group elements or sections. With groups, you can literally write full page markup with a single abbreviation.
Let’s create the markup for our page with header, .main and footer.
(header>nav>ul>li*3>a)+(.main>article.primary>h1+p^aside#sidebar)+footer>p{© 2013}will generate the following markup for our page.
<header>
<nav>
<ul>
<li><a href=""></a></li>
<li><a href=""></a></li>
<li><a href=""></a></li>
</ul>
</nav>
</header>

<div class="main">
<article class="primary">
<h1></h1>
<p></p>
</article>
<aside id="sidebar"></aside>
</div>

<footer>
<p>© 2013</p>
</footer>Emmet can use [attr] notation (as in CSS) to add custom attributes to your elements, for example for a link. It is useful to add default values to elements. You can place as many attributes as you like inside square brackets [ ]. If you don’t specify attribute values Emmet will produce tab stops inside each empty attribute (if your editor supports them).
Attribute without values
Example 1: No value
a[title]will generate the following markup with out any value.
<a href="" title=""></a>Example 2: With default values
td[title="Hello world!" colspan=3]will generate the following markup.
<td title="Hello world!" colspan="3"></td>Example 3: Attribute with values (multiple or single)
a[href="http://sitepoint.com" title="Learn HTML, CSS and more" target="_blank"]will generate a link with default values.
<a href="http://sitepoint.com" title="Learn HTML, CSS and more" target="_blank"></a>Adding default text to elements is simple, you can use curly braces {} with any element a, p, h1 to add custom text.
SimpelExample:
a{click here}will output
<a href="">click here</a>More Complex Example:
Here is one more complex example. If you type
p>{Click }+a{here}+{ to continue}and hit Tab or Ctr+E to expand it, you will have the following markup.
<p>Click <a href="">here</a> to continue</p>Web developers often use lorem ipsum text to add dummy data to their web pages, and to test how their HTML templates will look with real data. There are third party websites to generate lorem ipsum dummy text like http://www.lipsum.com/ and http://loremipsum.net/, but with Emmet you can generate lorem ipsum text on the fly.
Normally, lorem ipsum generates 30-word dummy text split into a few sentences, but with Emmet you can specify the number of words that should be generated right in the abbreviation.
Example 1: two paragraphs with default lorem ipsum
p*2>loremwill generate two paragraphs with dummy content.
<p>Lorem ipsum dolor sit amet, consectetur adipisicing elit. Quaerat, eaque, molestiae saepe aut autem in earum magnam harum enim obcaecati eum pariatur sit suscipit nisi repellat quia a ipsum reiciendis!</p
>
<p>Ipsum, laudantium, quia suscipit qui officia autem dicta alias explicabo illo quis voluptas corporis eveniet laborum ducimus possimus quas debitis sunt quibusdam libero deserunt. Odit nemo beatae officiis perspiciatis delectus.</p>
Example 2: specifying the number of words
Just add the number after “lorem”. p>lorem10 will generate 10 words and p>lorem50 will generate paragraphs with 50 words.
p>lorem10will generate a paragraph with 10 words.
<p>Lorem ipsum dolor sit amet, consectetur adipisicing elit. Consequuntur, asperiores.</p>Example 3: List items with lorem ipsum
This abbreviation will create an unordered list with four items with dummy text and the class of item.
ul.generic-list>lorem8.item*4Here is the output.
<ul class="generic-list">
<li class="item">Lorem ipsum dolor sit amet, consectetur adipisicing elit.</li>
<li class="item">Quis, dolorum blanditiis reiciendis eius facere nulla porro.</li>
<li class="item">Repellat, animi, nisi quibusdam esse distinctio nostrum blanditiis!</li>
<li class="item">Neque, eius temporibus itaque nostrum tempore expedita ad?</li>
</ul>Emmet has a special CSS resolver that expands such abbreviations into a complete CSS property. For CSS syntax, Emmet has a lot of predefined snippets for properties. Just like HTML, you can expand abbreviations into complete CSS properties.
Here are some examples.
Example 1: Predefined abbreviation
ffand hit tab. you will get
font-family: ;Example 2: Abbreviation with value
ff:awill output the following CSS code.
font-family: Arial, "Helvetica Neue", Helvetica, sans-serif;Example 3: Predefined abbreviation
mrwill output following CSS code.
margin-right: ;Example 4: Adding default value
mr10will output following CSS code.
margin-right: 10px;Example 5: Multiple values To add multiple values use a hypen to separate them:
m10-20will output following css code.
margin: 10px 20px;Example 6: Adding a negative value will precede the first value with a hyphen and all the rest with double hyphens
p-10--20will output following CSS code.
padding: -10px -20px;Vendor prefixes are common nowadays to use CSS3 properties. Emmet makes it easy to use vendor prefixes. Moreover, in editors with tab stops support (such as Eclipse, Sublime Text 2, Espresso etc), Emmet will create a linked value placeholder so you can type a property value and it will be automatically placed in all generated properties.
Example 1: Box-sizing
bxwill output following CSS code.
-webkit-box-sizing: border-box;
-moz-box-sizing: border-box;
box-sizing: border-box;
Example 2: Border Radius
-bdrswill output following CSS code.
-webkit-border-radius: ;
-moz-border-radius: ;
border-radius: ;
Example 3: Border Radius
-trfwill output the following CSS code.
-webkit-transform: ;
-moz-transform: ;
-ms-transform: ;
-o-transform: ;
transform: ;
Explicit vendor prefixed
If you need to output CSS properties with specified vendor prefixed properties only, you can do it with Emmet. Let’s say you need to output transform property with webkit and moz prefixes only. In this case you can expand the following abbreviation:
Example: Border Radius
-wm-trfwill output the following CSS code.
-webkit-transform: ;
-moz-transform: ;
transform: ;
CSS3 Gradients is a hard-to-write CSS3 feature, I cannot write it myself. I use an online CSS3 generator tools for CSS3 properties. Emmet makes it simple to write CSS3 gradients. Here’s what you need to type and the output you will get.
Example:
div{
lg(left, #fc0 30%, orange)
}
will output following css code.
div{
background-image: -webkit-gradient(linear, 0 0, 100% 0, color-stop(0.3, #fc0), to(orange));
background-image: -webkit-linear-gradient(left, #fc0 30%, orange);
background-image: -moz-linear-gradient(left, #fc0 30%, orange);
background-image: -o-linear-gradient(left, #fc0 30%, orange);
background-image: linear-gradient(left, #fc0 30%, orange);
}
You can see I have just used lg for liner gradient and added values. Emmet has turned my abbreviation into complete CSS3 code.
If you have followed the first three parts of this series, you now know how to create large code blocks with Emmet. However, sometimes you need to edit your existing HTML and CSS.
Emmet can do that for you as well. You can easily wrap existing text in Emmet. You can wrap individual lines or code blocks easily.
Let’s see some functions that help with this.
Ctrl+Alt+JIn HTML, this allows you to quickly traverse between the opening and closing tags. “Go to Matching Pair” action uses “HTML Matcher” internally, so it may also work in non-HTML syntax.
Example: With this action you can quickly jump to the end tag of any element.

Shift+Ctrl+GThis is a very powerful tool in Emmet. It takes an abbreviation, expands it and places the currently selected content in the last element of the generated snippet. You can easily wrap the text with HTML tags.
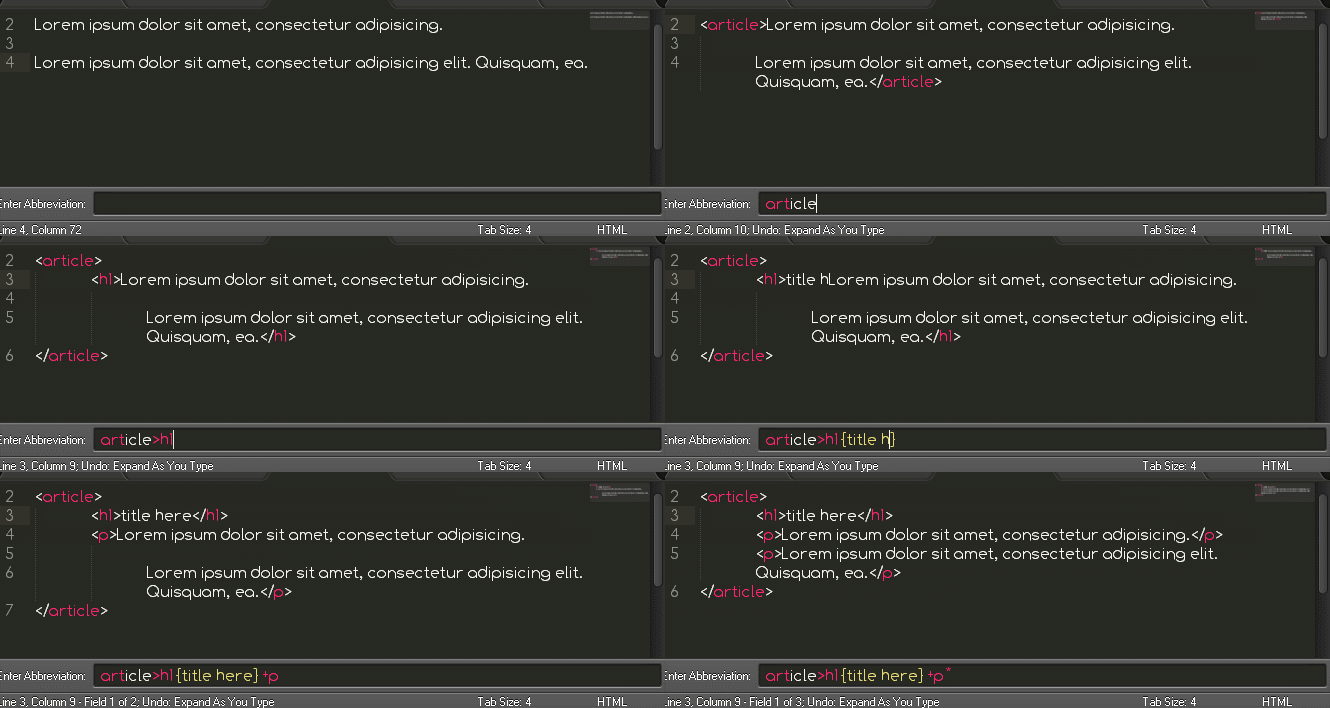
In the above image you can see:
article tag.p tag.h1 tag. Select the content and press Shift+Ctrl+G, then enter your abbreviation and press enter. For the above lines, I have used article>h1{title here}+p* abbreviation.
I have used > too add an h1 as child element and a + symbol to wrap both lines with p as a sibling element. The * symbol is used to wrap each line.
Ctrl+Shift+GorCtrl+Alt+Enter
This is one of best features of Emmet. You can wrap multiple paragraphs, lists etc with this feature very easily. To repeat an element you can use the * operator, as I have used in the above example. Let’s say you want to create a navigation menu. How do you do it?
Example Navigation Menu Let’s say you have four items, you want to wrap them in a ul and each li list item should be an a link.
Home
About
Portfolio
Contact
Select all items and press Ctrl+Shift+G or Ctrl+Alt+Enter and enter your abbreviation in the abbreviation panel. I have used a nav>ul>li*>a abbreviation to wrap menu items.
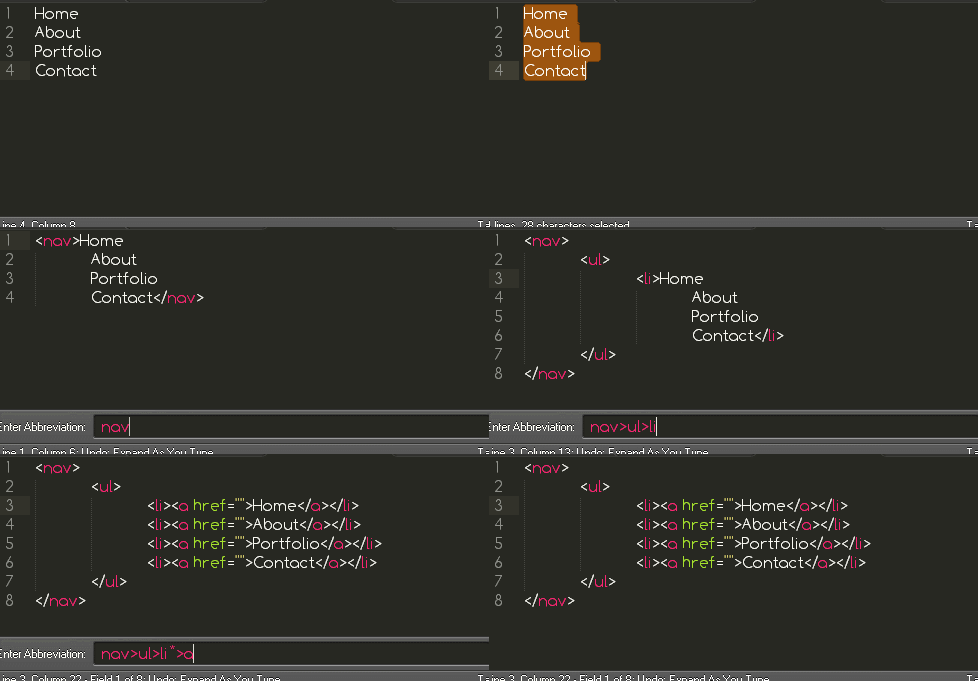
Here you can see final result our nav>ul>li*>a abbreviation has generated following HTML.
<nav>
<ul>
<li><a href="">Home</a></li>
<li><a href="">About</a></li>
<li><a href="">Portfolio</a></li>
<li><a href="">Contact</a></li>
</ul>
</nav>
A More Complex Example
Emmet allows us to control and provide default values or elements. Let’s see another, more complex, example. I am going to wrap the above menu with a more complex abbreviation. Here are our menu items.
Home
About
Portfolio
Contact
Now select these items and press Shift+Ctrl+G and enter the following abbreviation.
nav>ul>li[title=$#]*>a[href=$#.html]{$#}>img[src=$#.png alt="$#"].nav-bgThis will generate following code for menu items.
<nav>
<ul>
<li title="Home">
<a href="Home.html">Home
<img src="Home.png" alt="Home" class="nav-bg">
</a>
</li>
<li title="About">
<a href="About.html">About
<img src="About.png" alt="About" class="nav-bg">
</a>
</li>
<li title="Portfolio">
<a href="Portfolio.html">Portfolio
<img src="Portfolio.png" alt="Portfolio" class="nav-bg">
</a>
</li>
<li title="Contact">
<a href="Contact.html">Contact
<img src="Contact.png" alt="Contact" class="nav-bg">
</a>
</li>
</ul>
</nav>
In the above example, you can see it is very easy to generate complex HTML code with Emmet. It does take some time to master the Emmet syntax but after learning the abbreviations you will be able to generate complex HTML code.
This action works for HTML code blocks and allows you to quickly jump between important code points. You can easily type values for empty attributes.
You can use Tab to go to the next edit point and Shift+Tab to go to previous edit point in SublimeText.

— ⇧⌥/ / Shift+Ctrl+/Comments in HTML and CSS are very helpful for the web developer. Every text editor has some shortcuts to add comments. It is very good practice to comment out your code, especially in complex web pages, to indicate sections of a document. Comments can help you and others to understand your code.
You can easily comment out your HTML and CSS code with Emmet. Normally when there is no selection, text editors such as SublimeText toggle comments on the current line while Emmet’s toogle comment feature does this on the current context. For HTML it is a full tag, for CSS it is a rule or full property.
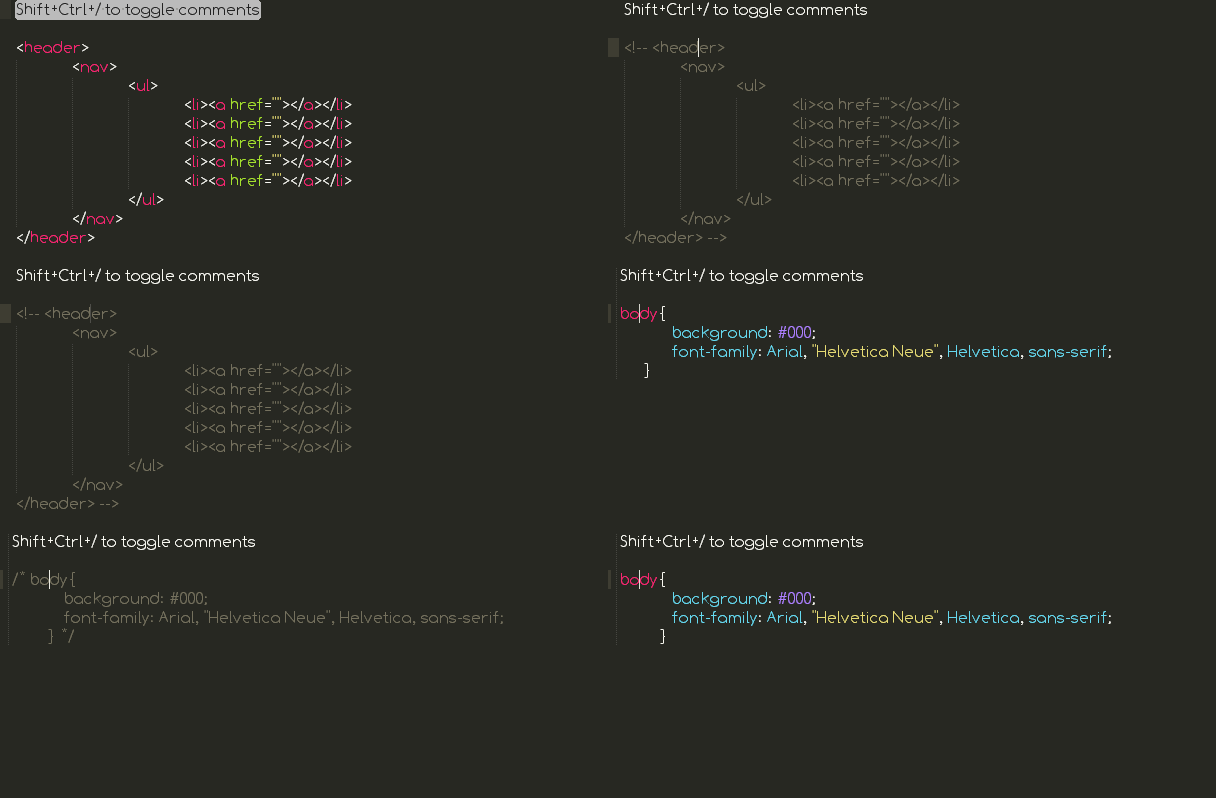
When you press Shift+Ctrl+/ for the first time, your code will be commented out, press again to remove the comments.
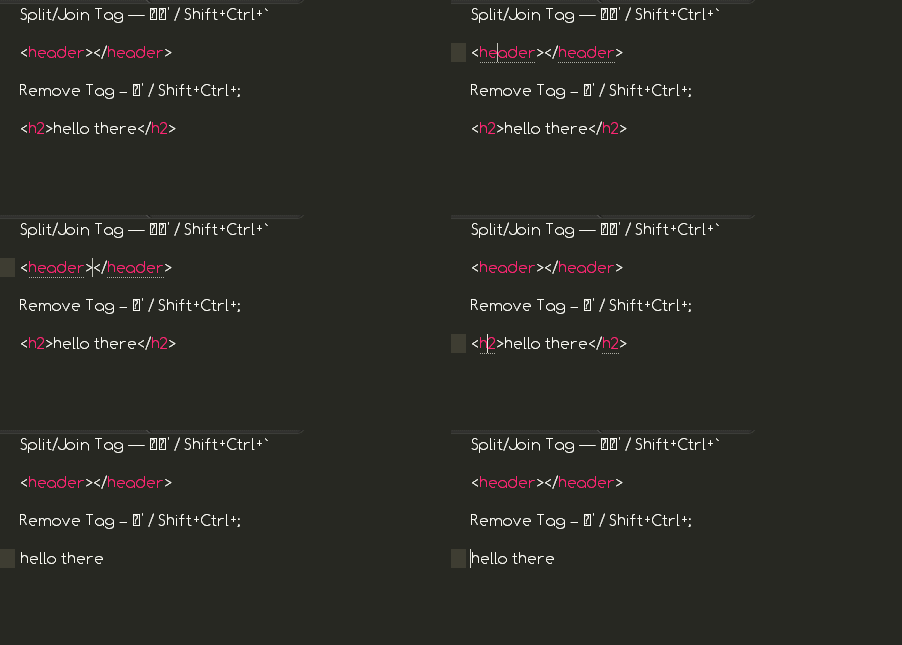
Sometimes you need to remove tags from your code. You can easily do it with Emmet.
Shift+Ctrl+` : This feature can convert <header></header> into <header/> and vice versa. (<header/> into <header></header> ).
The Shift+Ctrl+; shortcut will remove tags from element. For example, if you want to remove <h2></h2> from the following text <h2>hello there</h2>, you need to place your cursor inside the <h2></h2> tag, and then press the keyboard shortcut Shift+Ctrl+;.
